TOC
ad
Contents
Overview
This guide explains how to set up an environment on Windows 11 to transcribe speech using Whisper on your PC without using the paid cloud version of Python.This post serves as a memo for my own reference. Estimated time required is about 30 minutes.
Required Skills
You can enter commands in Powershell and run Python. Even beginners can do it.
Machine Environment
If you’re using Windows 11 and want to speed up calculations, an Nvidia graphics card is ideal.
Installing Python and FFmpeg
Install Python and FFmpeg for Whisper.
Installation is easier with Chocolatey, so install Chocolatey from the following site.
chocolatey
After installing Chocolatey, use the following command to install Python and FFmpeg.choco install python --version=3.10.0choco install ffmpegI’ll run it. Installing both at the same time.
Whisper WebUI Setup Guide
This time, create it within the user profile’s Documents folder.
Launch Terminal (or PowerShell).cd ~\documents Entering this will navigate to the document folder for the current user.mkdir WisPy This time, created in the folder named WisPy.
Next, create a virtual environment for this Python execution environment.cd WisPypython -m venv venv This time, create a virtual environment in the venv folder. If you encounter an error where Python commands are not accepted, restart Terminal and try again.cd venv Switch to the venv for the next taskexplorer . Enter the folder name to open it in File Explorer.
Create the following two files inside the venv folder.
Create install.txt
Open a text file in the folder, enter the following text, and save it.
openai-whisper>=20231117
streamlit>=1.27.0
torch>=2.0.0
torchaudio>=2.0.0
numpy==1.26.4
pydub>=0.25.1
librosa>=0.10.0
soundfile>=0.12.1Activate the Python virtual environment.
Return to the Terminal and activate it with the following command..\Scripts\activate
If you encounter an error preventing PowerShell from running, such as “cannot be loaded because running scripts is disabled on this system. For more information, see about_Execution_Policies,” you can change the policy using the following command.Set-ExecutionPolicy RemoteSigned
When executed correctly, the prompt will change to something like `venv PS C:~`.
From here on, commands will be executed within the virtual environment.
Install the Python libraries specified in install.txt.pip install -r .\install.txt
If you encounter errors such as “Failed to install numba” during library installation, your Windows file system settings may be causing the issue. In this case, you need to change the settings to allow longer PATHs.
Launch regedit.exe, navigate to HKEY_LOCAL_MACHINE\SYSTEM\CurrentControlSet\Control\FileSystem, change the value of LongPathsEnabled from 0 to 1, and restart Windows. After restarting,Navigate to the venv folder in Terminal and make sure to run .\Scripts\activateagain. Then, run pip install -r .\install.txtagain.
Wisp.py creation
This is a web application. This file enables Whisper to run in your browser.
#!/usr/bin/env python3
"""
Whisper Transcription Web App (Streamlit・Windows・Settings displayed on main screen)
"""

import os
import time
import tempfile
from datetime import datetime

import streamlit as st
import torch
import whisper

# Page configuration
st.set_page_config(
    page_title="Whisper Transcription Tool",
    page_icon="🔊",
    layout="wide",
)


@st.cache_resource
def load_whisper_model(model_name: str):
    """Load Whisper model (with cache)"""
    device = "cuda" if torch.cuda.is_available() else "cpu"
    return whisper.load_model(model_name, device=device)


def check_ffmpeg():
    """Check if FFmpeg is installed (using NUL for Windows)"""
    if os.system("ffmpeg -version > NUL 2>&1") != 0:
        st.error(
            "⚠️ FFmpeg is not installed.\n"
            "  Example: Run `choco install ffmpeg` in PowerShell with administrator privileges,\n"
            "      then reopen the terminal and try again. This is an example if chocolatey is installed."
        )
        st.stop()


def get_available_models():
    """List of available Whisper models"""
    return ["tiny", "base", "small", "medium", "large"]


def main():
    st.title("Whisper Transcription Tool (Settings on Main Display)")
    st.write(
        "Use Whisper in your local environment (Windows) to convert audio files to text. "
        "Specifying the language may improve accuracy and speed."
    )

    # Check FFmpeg
    check_ffmpeg()

    # Device information
    if torch.cuda.is_available():
        device_label = "GPU (CUDA)"
        st.info(f"Device in use: {device_label}")
    else:
        device_label = "CPU"
        st.info(
            f"Device in use: {device_label} (No CUDA-compatible GPU available, processing with CPU. Long audio files may take time)"
        )

    st.markdown("---")

    # ===== Settings area (top of main screen) =====
    st.subheader("Settings")

    col1, col2 = st.columns(2)

    with col1:
        model_name = st.selectbox(
            "Model Size",
            options=get_available_models(),
            index=1,  # base as default
            help="Larger models provide better accuracy but require more processing time and memory.",
        )

    with col2:
        language_code = st.selectbox(
            "Language (leave blank for auto-detection)",
            options=["", "en", "ja", "zh", "de", "fr", "es", "ko", "ru"],
            index=0,
            format_func=lambda x: {
                "": "Auto-detect",
                "en": "English",
                "ja": "Japanese",
                "zh": "Chinese",
                "de": "German",
                "fr": "French",
                "es": "Spanish",
                "ko": "Korean",
                "ru": "Russian",
            }.get(x, x),
            help="If you know the language of the audio, specifying it will improve accuracy and speed.",
        )

    st.markdown("---")

    # ===== Audio file upload =====
    st.subheader("Audio File")

    uploaded_file = st.file_uploader(
        "Upload an audio file such as mp3 / m4a / wav",
        type=["mp3", "wav", "m4a", "ogg", "flac"],
    )

    if uploaded_file is None:
        st.info("Upload an audio file to see information here.")
        return

    # Get extension and display basic info
    ext = uploaded_file.name.split(".")[-1].lower()
    file_size_mb = uploaded_file.size / (1024 * 1024)
    st.write(f"- File name: `{uploaded_file.name}` (approx. {file_size_mb:.2f} MB)")

    # Audio preview
    st.audio(uploaded_file, format=f"audio/{ext}")

    st.markdown("### Transcription")

    if st.button("Start Transcription", type="primary"):
        progress_text = st.empty()
        progress_bar = st.progress(0)

        try:
            # 1. Create temporary file
            progress_text.text("Creating temporary file...")
            progress_bar.progress(10)

            with tempfile.NamedTemporaryFile(delete=False, suffix=f".{ext}") as tmp:
                tmp.write(uploaded_file.getvalue())
                temp_path = tmp.name

            # 2. Load model
            progress_text.text(f"Loading model `{model_name}`...")
            load_start = time.time()
            model = load_whisper_model(model_name)
            load_end = time.time()
            progress_bar.progress(40)
            progress_text.text(
                f"Model loading complete ({load_end - load_start:.2f} seconds). Starting transcription..."
            )

            # 3. Transcription
            transcribe_start = time.time()
            progress_bar.progress(50)

            transcribe_options = {}
            if language_code:
                transcribe_options["language"] = language_code

            result = model.transcribe(temp_path, **transcribe_options)

            transcribe_end = time.time()
            progress_bar.progress(100)
            progress_text.text("Transcription complete. Displaying results...")

            total_time = transcribe_end - load_start
            transcribe_time = transcribe_end - transcribe_start

        except Exception as e:
            progress_bar.progress(0)
            progress_text.empty()
            st.error(f"An error occurred: {e}")
            return

        finally:
            # Delete temporary file
            if "temp_path" in locals() and os.path.exists(temp_path):
                try:
                    os.unlink(temp_path)
                except OSError:
                    pass

        # ===== Display results =====
        st.success(
            f"Transcription complete (transcription processing: {transcribe_time:.2f} seconds / total: {total_time:.2f} seconds)"
        )

        text = result.get("text", "")

        st.markdown("### Result (Full Text)")
        st.text_area("Transcription result", value=text, height=250)

        st.download_button(
            label="Download Text",
            data=text,
            file_name=f"{os.path.splitext(uploaded_file.name)[0]}_transcript.txt",
            mime="text/plain",
        )

if __name__ == "__main__":
main()I’ll test-run the environment I’ve built.streamlit run .\web.py
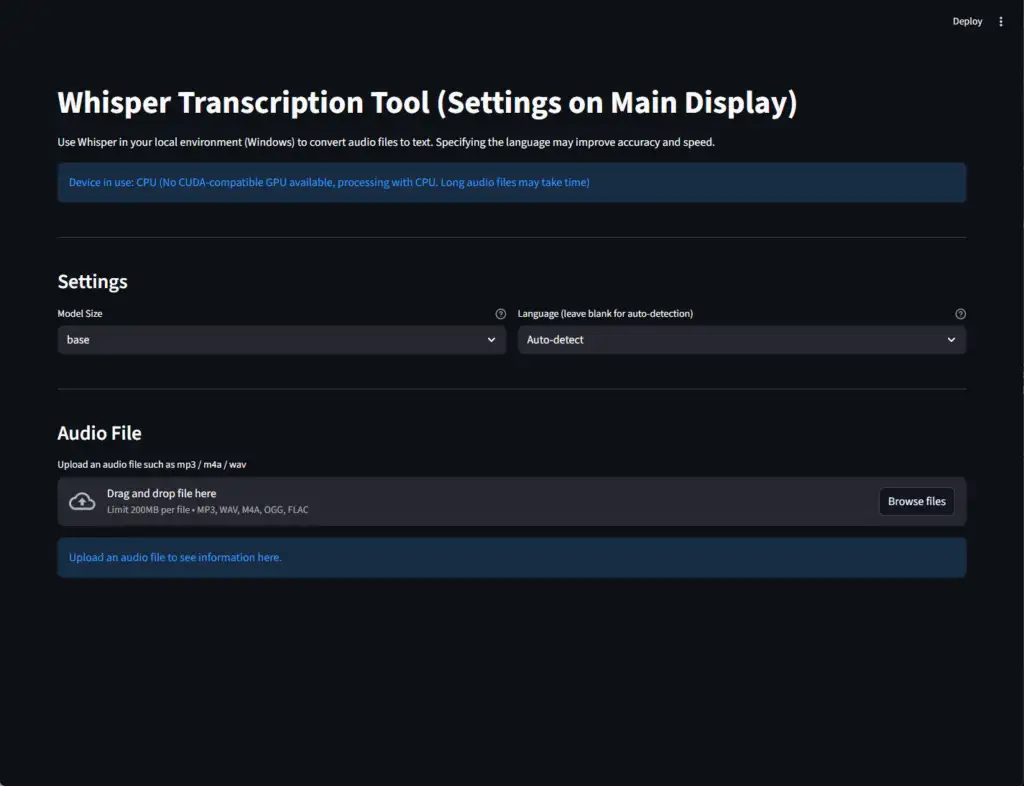
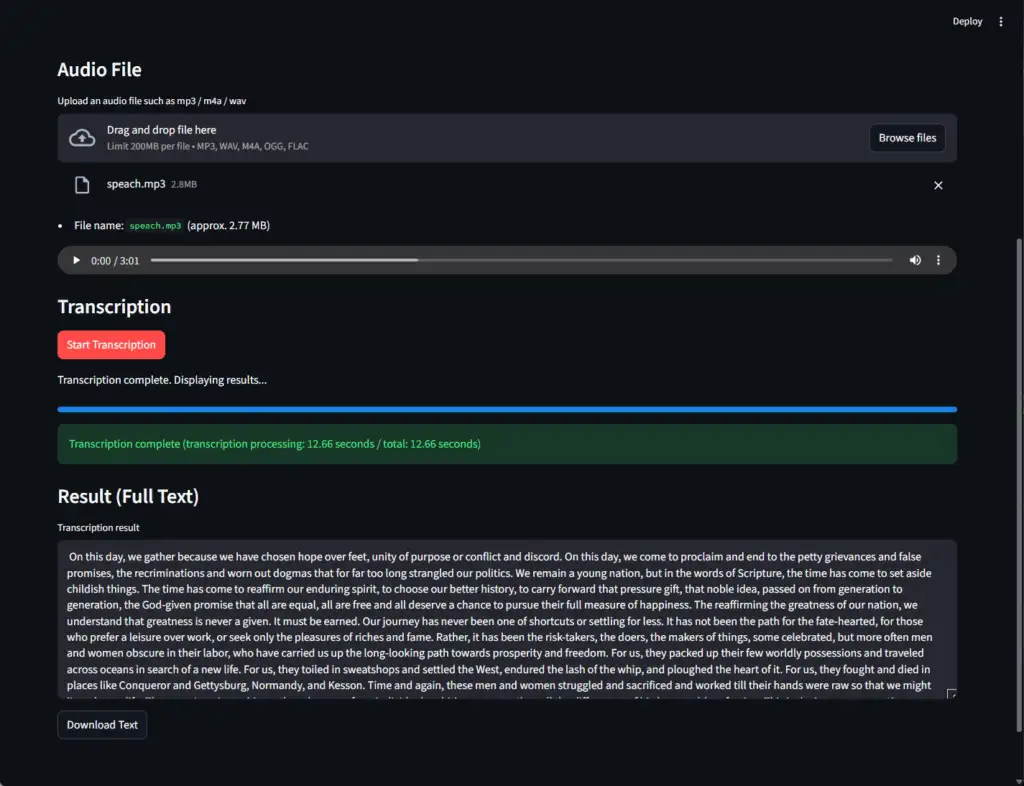
A window like the following will open in your web browser.
Click Browse Files, select the corresponding audio file, and run Start Transcription to verify the operation.
How to Use
To use it, follow these steps to start it up.
Python virtual environments and web apps will stop running when you restart your PC. Since you need to start them up every time, it’s easier to create a startup batch file.
Using a standard business PC (Intel Core i5, 16GB RAM) with the Base model, transcription of approximately 2 minutes of meeting data took about 110 seconds.
ad